简介
源码地址 spring-projects/spring-kafka
spring 对框架的封装 套路很一致,参见 spring redis 源码分析 以及 spring 对rabbitmq 的代码。
代码示例
kafka-producer.xml
<!--基本配置 -->
<bean id="producerProperties" class="java.util.HashMap">
    <constructor-arg>
        <map>
            <!-- kafka服务地址,可能是集群-->
            <entry key="bootstrap.servers" value="192.168.62.212:9092,192.168.62.213:9092,192.168.62.214:9092"/>
            <!-- 有可能导致broker接收到重复的消息,默认值为3-->
            <entry key="retries" value="10"/>
            <!-- 每次批量发送消息的数量-->
            <entry key="batch.size" value="1638"/>
            <!-- 默认0ms,在异步IO线程被触发后(任何一个topic,partition满都可以触发)-->
            <entry key="linger.ms" value="1"/>
            <!--producer可以用来缓存数据的内存大小。如果数据产生速度大于向broker发送的速度,producer会阻塞或者抛出异常 -->
            <entry key="buffer.memory" value="33554432 "/>
            <!-- producer需要server接收到数据之后发出的确认接收的信号,此项配置就是指procuder需要多少个这样的确认信号-->
            <entry key="acks" value="all"/>
            <entry key="key.serializer" value="org.apache.kafka.common.serialization.StringSerializer"/>
            <entry key="value.serializer" value="org.apache.kafka.common.serialization.StringSerializer"/>
        </map>
    </constructor-arg>
</bean>
<!-- 创建kafkatemplate需要使用的producerfactory bean -->
<bean id="producerFactory"
      class="org.springframework.kafka.core.DefaultKafkaProducerFactory">
    <constructor-arg>
        <ref bean="producerProperties"/>
    </constructor-arg>
</bean>
<!-- 创建kafkatemplate bean,使用的时候,只需要注入这个bean,即可使用template的send消息方法 -->
<bean id="KafkaTemplate" class="org.springframework.kafka.core.KafkaTemplate">
    <constructor-arg ref="producerFactory"/>
    <!--设置对应topic-->
    <property name="defaultTopic" value="bert"/>
</bean>
// 测试类
@RunWith(SpringJUnit4ClassRunner.class)
@ContextConfiguration(locations = "classpath:kafka-producer.xml")
public class KafkaTemplateTest {
    @Autowired
    private KafkaTemplate<Integer, String> kafkaTemplate;
    @Test
    public void hello(){
        kafkaTemplate.sendDefault("hello world");
    }
}
kafka-consumer.xml
<bean id="consumerProperties" class="java.util.HashMap">
        <constructor-arg>
            <map>
                <!--Kafka服务地址 -->
                <entry key="bootstrap.servers" value="192.168.62.212:9092,192.168.62.213:9092,192.168.62.214:9092" />
                <!--Consumer的组ID,相同goup.id的consumer属于同一个组。 -->
                <entry key="group.id" value="bert.mac" />
                <!--如果此值设置为true,consumer会周期性的把当前消费的offset值保存到zookeeper。当consumer失败重启之后将会使用此值作为新开始消费的值。 -->
                <entry key="enable.auto.commit" value="true" />
                <!--网络请求的socket超时时间。实际超时时间由max.fetch.wait + socket.timeout.ms 确定 -->
                <entry key="session.timeout.ms" value="15000 " />
                <entry key="key.deserializer"
                    value="org.apache.kafka.common.serialization.StringDeserializer" />
                <entry key="value.deserializer"
                    value="org.apache.kafka.common.serialization.StringDeserializer" />
            </map>
        </constructor-arg>
    </bean>
    <!--指定具体监听类的bean -->
    <bean id="messageListernerConsumerService" class="com.ximalaya.queue.KafkaConsumerListener" />
    <!-- 创建consumerFactory bean -->
    <bean id="consumerFactory" class="org.springframework.kafka.core.DefaultKafkaConsumerFactory">
        <constructor-arg>
            <ref bean="consumerProperties"/>
        </constructor-arg>
    </bean>
    <bean id="containerProperties" class="org.springframework.kafka.listener.config.ContainerProperties">
        <!-- 要消费的 topic -->
        <constructor-arg value="bert"/>
        <property name="messageListener" ref="messageListernerConsumerService"/>
    </bean>
    <bean id="messageListenerContainer" class="org.springframework.kafka.listener.KafkaMessageListenerContainer" init-method="doStart">
        <constructor-arg ref="consumerFactory"/>
        <constructor-arg ref="containerProperties"/>
    </bean>
生产者

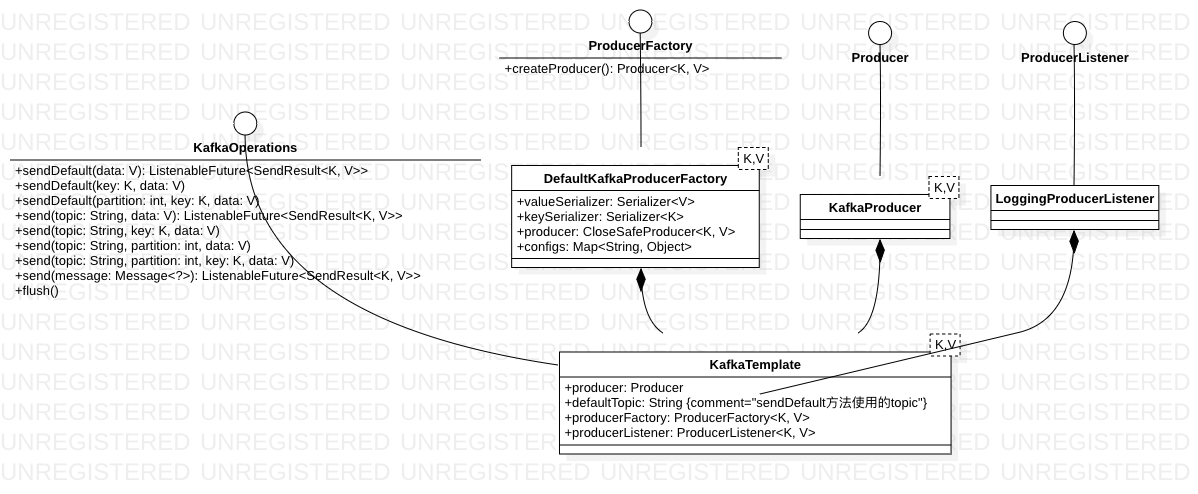
- 相对于 《Apache Kafka源码分析》——Producer与Consumer直接使用KafkaProducer, DefaultKafkaProducerFactory 典型的工厂模式, 封装了kafka producer 配置
-
KafkaTemplate 来了一个 经典的单例模式
 public class KafkaTemplate<K, V> implements KafkaOperations<K, V> {
     private final ProducerFactory<K, V> producerFactory;
     // volatile 保证多线程的可见性
     private volatile Producer<K, V> producer;
     private Producer<K, V> getTheProducer() {
         if (this.producer == null) {
             synchronized (this) {
                 // 多重检查
                 if (this.producer == null) {
                     this.producer = this.producerFactory.createProducer();
                 }
             }
         }
         return this.producer;
     }
 }
发送逻辑
public ListenableFuture<SendResult<K, V>> send(String topic, V data) {
    ProducerRecord<K, V> producerRecord = new ProducerRecord<>(topic, data);
    return doSend(producerRecord);
}
protected ListenableFuture<SendResult<K, V>> doSend(final ProducerRecord<K, V> producerRecord) {
    getTheProducer();
    final SettableListenableFuture<SendResult<K, V>> future = new SettableListenableFuture<>();
    getTheProducer().send(producerRecord, new Callback() {
        public void onCompletion(RecordMetadata metadata, Exception exception) {
            if (exception == null) {
                future.set(new SendResult<>(producerRecord, metadata));
                if (KafkaTemplate.this.producerListener != null
                        && KafkaTemplate.this.producerListener.isInterestedInSuccess()) {
                    KafkaTemplate.this.producerListener.onSuccess(producerRecord.topic(),
                            producerRecord.partition(), producerRecord.key(), producerRecord.value(), metadata);
                }
            }else {
                future.setException(new KafkaProducerException(producerRecord, "Failed to send", exception));
                if (KafkaTemplate.this.producerListener != null) {
                    KafkaTemplate.this.producerListener.onError(producerRecord.topic(),
                            producerRecord.partition(), producerRecord.key(), producerRecord.value(), exception);
                }
            }
        }
    });
    if (this.autoFlush) {
        flush();
    }
    return future;
}
- 将KafkaProducer 的send callback 转换为ListenableFuture
- 使用 producerListener 将“事件处理”逻辑与发送主流程解耦
消费者

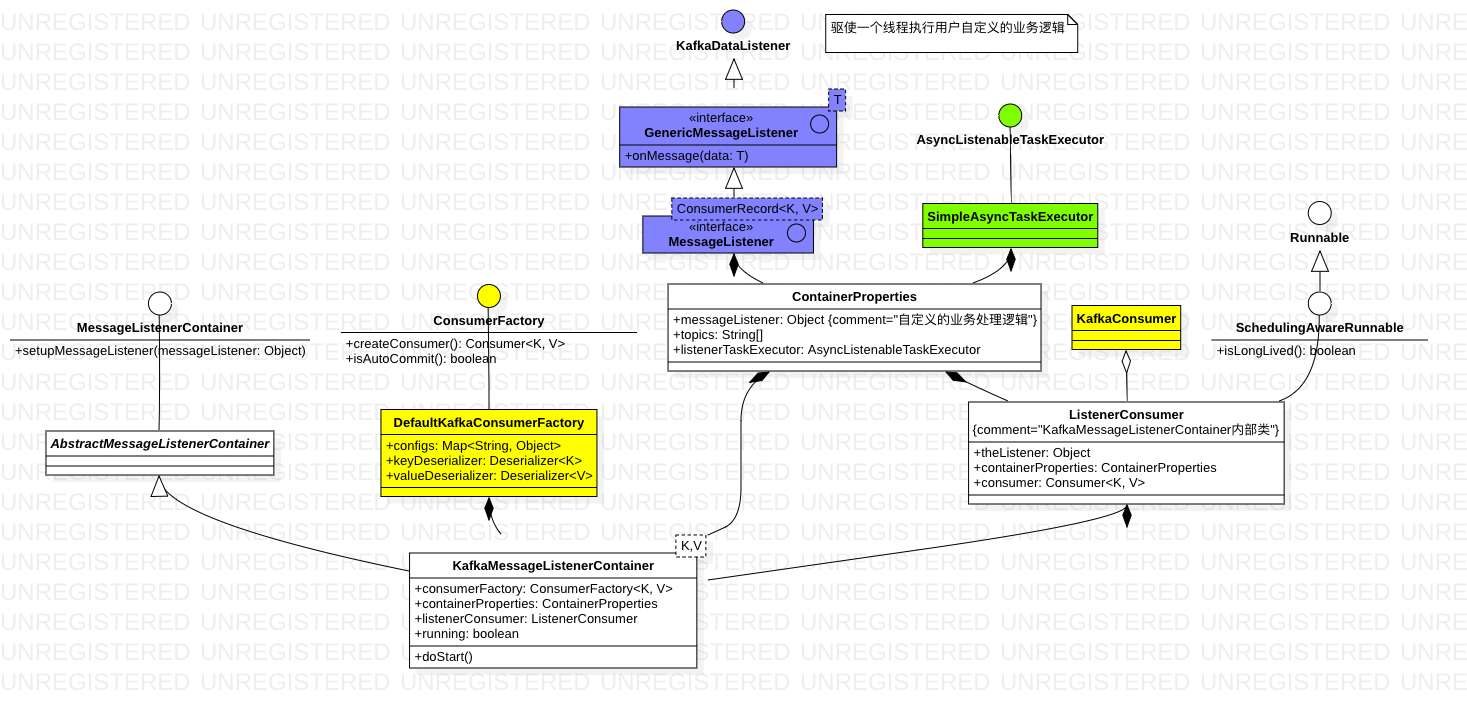
- 黄色DefaultKafkaConsumerFactory 就是一个单纯的工厂模式,根据配置构造KafkaConsumer
-
MessageListenerContainer 类注释 Internal abstraction used by the framework representing a message listener container,封装了两件事
- 如何创建KafkaConsumer
- 如何消费收到的消息,业务方定义
- 如何执行KafkaConsumer
启动逻辑 KafkaMessageListenerContainer.doStart
protected void doStart() {
    ...
    setRunning(true);
    // 关键就是最后的提交 task
    this.listenerConsumerFuture = containerProperties
                .getConsumerTaskExecutor()
                .submitListenable(this.listenerConsumer);
}
执行逻辑 ListenerConsumer.run
public void run() {
    // 不停地拉取 消息并调用 MessageListener执行用户自定义的业务逻辑
    while (isRunning()) {
        if (!this.autoCommit) {
            processCommits();
        }
        ...
        ConsumerRecords<K, V> records = this.consumer.poll(this.containerProperties.getPollTimeout());
        if (records != null && records.count() > 0) {
            if (this.autoCommit) {
                invokeListener(records);
            }else {
                ...
            }
        }else {
            ...
        }
    }
    // 表示consumer已经关闭,进行清理动作
    if (this.listenerInvokerFuture != null) {
        stopInvokerAndCommitManualAcks();
    }
    try {
        this.consumer.unsubscribe();
    }catch (WakeupException e) {
        // No-op. Continue process
    }
    this.consumer.close();
}
spring task Executor 体系

TaskExecutor 类注释 Implementations can use all sorts of different execution strategies,such as: synchronous, asynchronous, using a thread pool, and more.
Equivalent to JDK 1.5’s java.util.concurrent.Executor interface; extending it now in Spring 3.0, so that clients may declare a dependency on an Executor and receive any TaskExecutor implementation.This interface remains separate from the standard Executor interface mainly for backwards compatibility with JDK 1.4 in Spring 2.x.
说白了就是为了方便 代码中引入和使用Executor 而设计的,又不想受jdk Executor 接口演变的影响,所以自定义了一个子接口。 PS:除了简单的java bean,spring 试图将所有的java 类都纳入到IOC 的管理。
@Service
public class BusinessService{
    @Autowire
    private Executor executor;
}
从方法注释上看,TaskExecutor.execute 和 Executor.execute 的重大区别是,TaskExecutor.execute 根据实现的不同 可能异步可能阻塞, 而Executor.execute 则标明了是异步的。
public class SimpleAsyncTaskExecutor{
    // SimpleAsyncTaskExecutor 最后落脚的方法
    protected void doExecute(Runnable task) {
        Thread thread = (this.threadFactory != null ? this.threadFactory.newThread(task) : createThread(task));
        thread.start();
    }
}
