简介
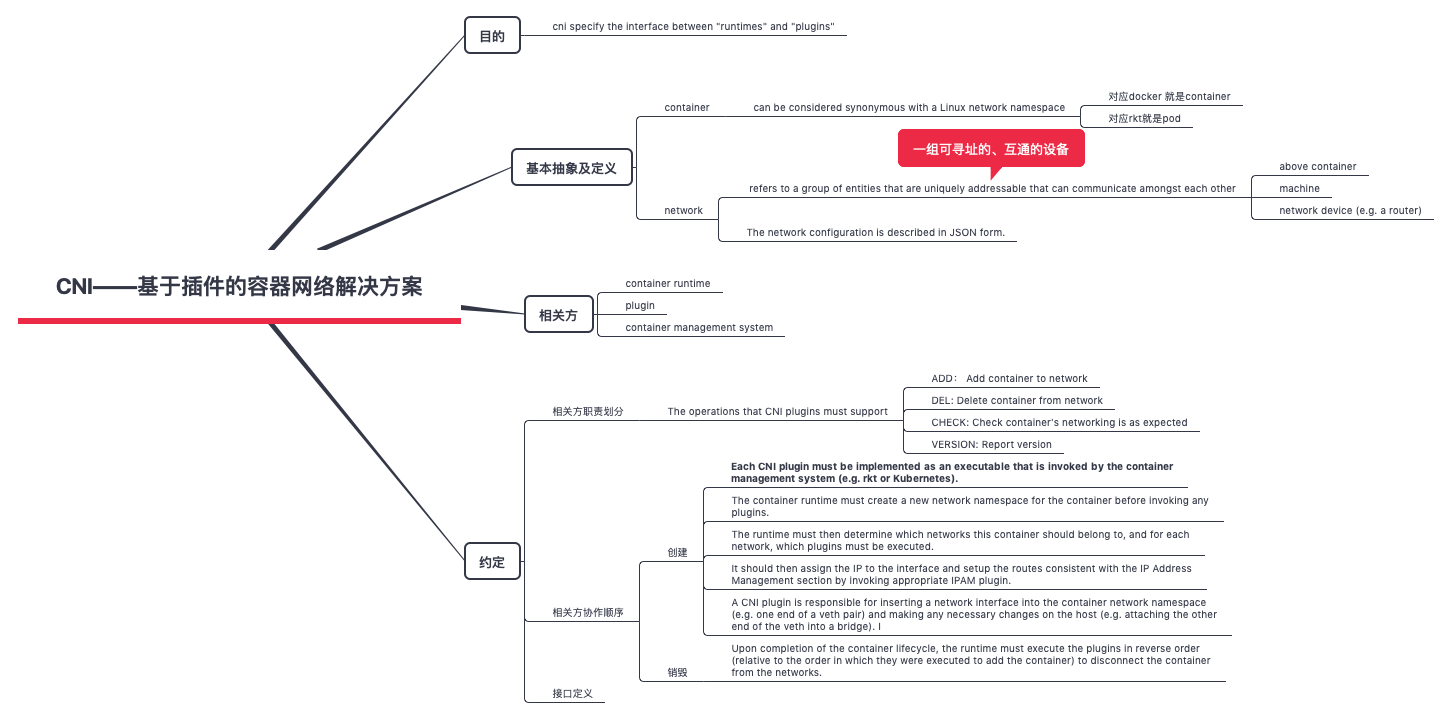
CNI,即Kubernetes 的网络插件的接口规范的定义,主要能力是对接 Kubelet 完成容器网卡的创建,申请和设置 ip 地址,路由设置,网关设置。核心接口就是 cmdAdd/cmdDel ,调用接口期间,会传递 Pod 相关的信息,特别是容器网卡的 name,以及 Pod 的 network namespace 等信息。
整体架构
先说网络再说Pod
很多文章都是从跨主机容器如何通信 的来阐述网络方案,这或许是一个很不好的理解曲线,从实际来说,一定是先有网络,再为Pod “连上网”。分阶段理解容器网络,即先有网络通信能力,再有Pod接入网络
- 集群阶段, 确定的集群的CIDR,为每个节点分配 podCIDR/网段。 Kubernetes Pod 如何获取 IP 地址集群 CIDR 和 节点podCIDR: 如果要求所有 Pod 具有 IP 地址,那么就要确保整个集群中的所有 Pod 的 IP 地址是唯一的。这可以通过为每个节点分配一个唯一的子网(podCIDR)来实现,即从子网中为 Pod 分配节点 IP 地址。Kube-controller-manager(配置了集群的CIDR) 为每个节点分配一个 podCIDR。从 podCIDR 中的子网值为节点上的 Pod 分配了 IP 地址。由于所有节点上的 podCIDR 是不相交的子网,因此它允许为每个 pod 分配唯一的IP地址。
- 节点阶段
- 集群范围内,为每个节点增加路由表项
- 节点内,运行一些守护进程(以同步数据、接受指令),创建虚拟网桥cni0,以及与 cni0 相关的路 由。 这些配置的作用是,从节点外部进来的网络包,如果目的 IP 是 podCIDR,则会 被节点转发到 cni0 虚拟局域网里。 前两个阶段,集群实际上已经为 Pod 之间搭建了网络通信的干道。
- pod 阶段。kubelet 会通过 cni 为这个 Pod 本身创建网络命名空间和 veth 设备,然后,把其中一个 veth 设备加入到 cni0 虚拟 网桥里,并为 Pod 内的 veth 设备配置 ip 地址。这样 Pod 就和网络通信的干道连接 在了一起。
先说Pod再说网络
理解 CNI 和 CNI 插件CNI 插件的实现通常包含两个部分:
-
一个二进制的 CNI 插件去配置 Pod 网卡和 IP 地址。这一步配置完成之后相当于给 Pod 上插上了一条网线,就是说它已经有自己的 IP、有自己的网卡了;
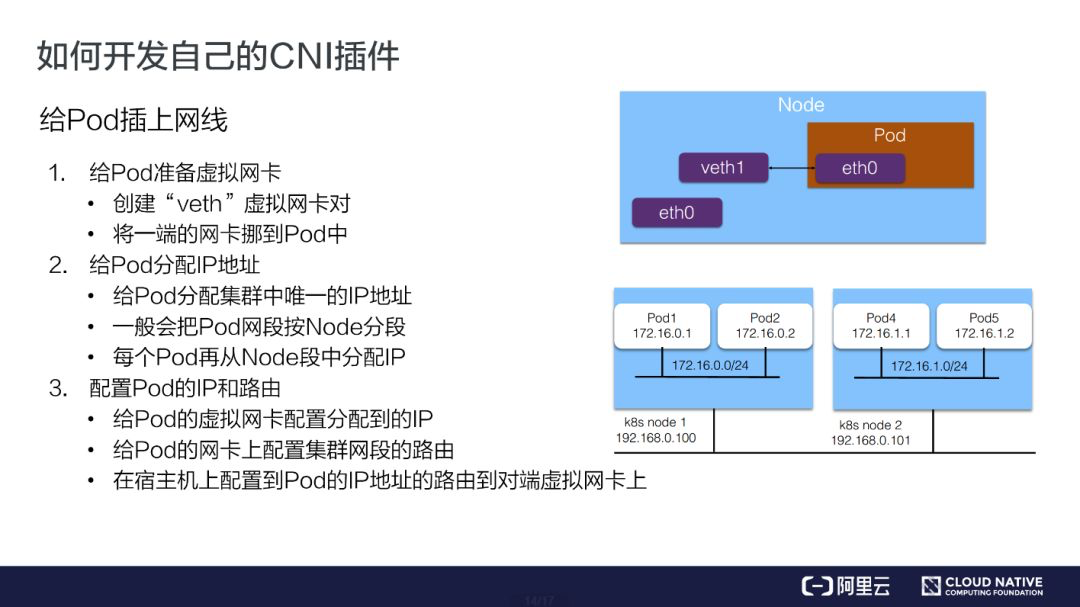
通常我们会用一个 “veth” 这种虚拟网卡,一端放到 Pod 的网络空间,一端放到主机的网络空间,这样就实现了 Pod 与主机这两个命名空间的打通。
-
一个 Daemon 进程去管理 Pod 之间的网络打通。这一步相当于说将 Pod 真正连上网络,让 Pod 之间能够互相通信。
- 首先 CNI 在每个节点上运行的 Daemon 进程会学习到集群所有 Pod 的 IP 地址及其所在节点信息;学习的方式通常是通过监听 K8s APIServer,拿到现有 Pod 的 IP 地址以及节点,并且新的节点和新的 Pod 的创建的时候也能通知到每个 Daemon。
- 拿到 Pod 以及 Node 的相关信息之后,再去配置网络进行打通。首先 Daemon 会创建到整个集群所有节点的通道。这里的通道是个抽象概念,具体实现一般是通过 Overlay 隧道、阿里云上的 VPC 路由表、或者是自己机房里的 BGP 路由完成的。第二步是将所有 Pod 的 IP 地址跟上一步创建的通道关联起来。关联也是个抽象概念,具体的实现通常是通过 Linux 路由、fdb 转发表或者OVS 流表等完成的。
- Linux 路由可以设定某一个 IP 地址路由到哪个节点上去。
- fdb 转发表是 forwarding database 的缩写,就是把某个 Pod 的 IP 转发到某一个节点的隧道端点上去(Overlay 网络)。
- OVS 流表是由 Open vSwitch 实现的,它可以把 Pod 的 IP 转发到对应的节点上。
深入了解一个网络组件的切入点就是:网络组件的cni plugin 与 网络组件的node agent 的分工边界。
Kubernetes 对 Pod IP 的管理
- 在 kube-controller-manager 有众多控制器,与 Pod IP 相关的是 NodeIpamController。NodeIpamController 控制器主要是管理节点的 podcidr,当有新节点加入集群时,分配一个子网段给节点;当节点删除时,回收子网段。每个节点的子网段不会重叠,每个节点都能够独立地完成 Pod IP 的分配。在集群规划时需要根据集群规模调整 cluster-cidr、node-cidr-mask-size 参数
- Kubelet 创建 Pod 的过程
- Pod 调度到某个节点上
- kubelet 通过 cri 调用 container runtime 创建 sandbox
- container runtime 创建 sandbox
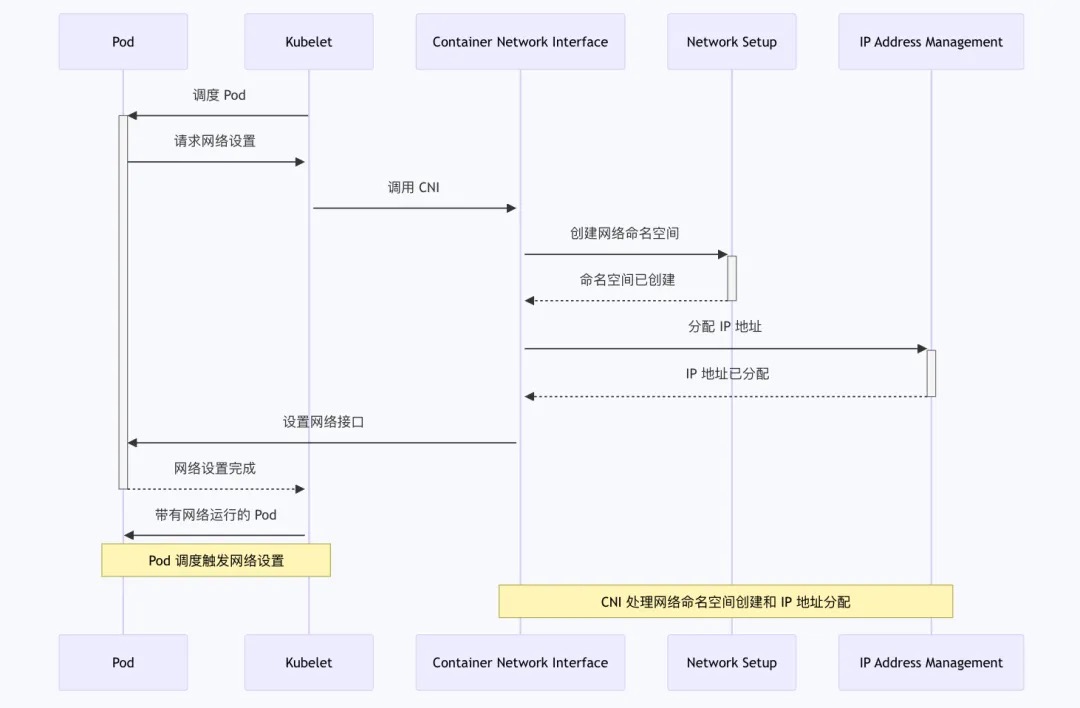
- container runtime 调用 cni 创建 Pod 网络
- IPAM 对 Pod IP 的管理
在工作中很多熟悉的路径,可能仅仅只是知道大概的流程,不知道具体的实现。通过源码分析,可以更加深入地了解相关的细节,也能学习到新的知识。比如,在源码中,我看到了 InPlacePodVerticalScaling 这个参数,发现是 Kubernetes 1.27 的一个 alpha 特性,可以在不重启 Pod 的情况下,调整 Pod 的资源配置。
CNI SPEC
- 容器在运行中会需要容器间或者容器与集群外部之间的信息传输,这时候容器就要在网络层面拥有一个名字(即 IP 地址),由此容器网络就应运而生。由于主机与容器、容器与容器间的网络栈并不相通,也没有统一的控制面,导致容器间无法直接的感知。
- 容器和该容器所在的宿主机是分隔的两地,如果需要连通就得建立一座桥梁,但由于容器侧还没有名字,就无法建立桥梁,这时候就先需要给容器侧命名,这样才能成功建立起桥梁。网络插件就是起到给容器侧命名和建立桥梁的功能。即网络插件将网络接口插入容器网络命名空间(例如,veth 对的一端),并在主机上进行任何必要的改变(例如将 veth 的另一端连接到网桥)。然后通过调用适当的 IPAM 插件(IP 地址管理插件)分配给接口一个空闲的 IP 地址,并设置与此 IP 地址相对应的路由规则。
CNI (Container Network Interface): Specification that act as interface between Container runtime and networking model implementations。The cni specification is lightweight; it only deals with the network connectivity of containers,as well as the garbage collection of resources once containers are deleted.
规范细节
cni 接口规范,不是很长Container Network Interface Specification(原来技术的世界里很多规范用Specification 来描述)。对 CNI SPEC 的解读 Understanding CNI (Container Networking Interface)
k8s 自己没有实现太多跟网络相关的操作,而是制定了一个规范。一共就三点:
- “首先!有一个配置文件!配置文件里写上要使用的网络插件名儿,然后以及一些该插件需要的信息”。
- “其次!让 CRI 调用这个插件,并把容器的运行时信息,包括容器的命名空间,容器 ID 等信息传给插件”。
- “最后!你这插件自己爱干啥干啥去吧,都嚯嚯完了玩够了给我吐一个结果,结果里头能让我知道你给 pod 的 ip 是啥就行了”
CNI 规范包含以下几个核心组成部分: • 网络配置的格式:定义了管理员如何定义网络配置。 • 请求协议:描述了容器运行时如何向网络插件发出网络配置或清理请求。 • 插件执行过程:详细阐述了插件如何根据提供的配置执行网络设置或清理。 • 插件委派:允许插件将特定功能委托给其他插件执行。 • 结果返回:定义了插件执行完成后如何向运行时返回结果的数据格式。
CNI 规范的一些要点 • CNI 是一个插件化的容器化网络解决方案 • CNI 插件为可执行文件 • 单个 CNI 插件的职责是单一的 • CNI 插件是呈链式调用的 • CNI 规范为一个容器定义一个 Linux 网络命名空间 • CNI 的网络定义存储为 JSON 格式 • 网络定义通过 STDIN 输入流传输到插件,这意味着宿主机上不会存储网络配置文件,其他的配置参数通过环境变量传递给插件
CNI 插件根据操作类型,接收相应的网络配置参数,执行网络配置或清理任务,并返回执行结果。
kubernetes 对CNI 的实现(SPEC复杂的描述体现在 code 上就是几个函数)
## github.com/containernetworking/cni/libcni/api.go
type CNI interface {
    AddNetworkList(net *NetworkConfigList, rt *RuntimeConf) (types.Result, error)
    DelNetworkList(net *NetworkConfigList, rt *RuntimeConf) error
    AddNetwork(net *NetworkConfig, rt *RuntimeConf) (types.Result, error)
    DelNetwork(net *NetworkConfig, rt *RuntimeConf) error
}
CNI 配置文件的位置是可配置的,默认值为 /etc/cni/net.d/<config-file>。集群管理员需要在每个节点上交付 CNI 插件。CNI 插件的位置也是可配置的,默认值为 /opt/cni/bin。
CNI 实现思路
Kubernetes 网络流量流转路径节点上的每一个 Pod 都会有一个对应的 pause 容器。这个 pause 容器负责创建和维持网络命名空间,包含非常少的代码,并且在部署后立即进入睡眠状态(所以不太可能有任何错误)。底层容器运行时会完成网络命名空间的创建,通常是由 containerd 或 CRI-O 完成。在部署 Pod 和创建容器之前,由运行时创建网络命名空间(不需要手工执行 ip netns 创建命名空间)。
CNI :在 Pod 网络命名空间内,创建了一个接口,并分配了一个 IP 地址。为了让一个 Pod 与其他 Pod 通信,它必须先访问节点的根命名空间。通过虚拟以太网对来实现 Pod 和根命名空间的连接。网桥会汇聚位于根命名空间中的每一个虚拟接口。这个网桥允许虚拟 pair 之间的流量,也允许穿过公共根命名空间的流量。
- 同一节点上 Pod 到 Pod 的流量。假设同一个节点上有两个 Pod,Pod-A 向 Pod-B 发送消息。由于访问目标不在同一个命名空间,Pod-A 将数据包发送到其默认接口 eth0。这个接口与 veth 对的一端绑定,作为隧道。这样,数据包会被转发到节点上的根命名空间。 以太网网桥作为一个虚拟交换机,需要目标 Pod-B 的 MAC 地址才能工作。ARP 协议会解决这个问题。当帧到达网桥时,会向所有连接的设备发送 ARP 广播。网桥广播询问持有 Pod-B 的 IP 地址。此时会收到一个带有 Pod-B IP 的 MAC 地址应答,这条消息会被存储在桥接 ARP 缓存(查找表)中。 IP 地址和 MAC 地址的映射关系存储之后,网桥就在表中查找,并将数据包转发到正确的端点。数据包到达根命名空间内 Pod-B 的 veth 之后,很快又到达 Pod-B 命名空间内的 eth0 接口。至此,Pod-A 和 Pod-B 之间的通信就成功了。
- 不同节点上的 Pod 到 Pod 通信。前几个步骤保持不变,当目的 IP 不在本地网络中时(此时 不会发生 ARP 解析,因为源 IP 和目标 IP 不在同一个网段中),报文被转发到节点的默认网关。节点的出口网关或默认网关,通常位于节点与网络相连的物理接口 eth0 上。目标 IP 与数据包的源不在同一个网络上,数据包将通过默认网关转发。现在,数据包路由到另一个节点的默认接口,我们称为 Node-B。以相反的顺序。现在,数据包位于 Node-B 的根命名空间,并到达网桥,这里会进行 ARP 解析。路由系统将返回与 Pod-B 相连的接口的 MAC 地址。网桥通过 Pod-B 的 veth 设备转发帧,并到达 Pod-B 的命名空间。
如果没有 CNI,你需要人工完成如下操作:
- 创建接口。
- 创建 veth 对。
- 设置网络命名空间。
- 设置静态路由。
- 配置以太网桥。
- 分配 IP 地址。
- 创建 NAT 规则。
- 还有其他大量事情。 这还不包括,在删除或重启 Pod 时,需要进行类似的全部操作。
使用CNI binary
CNI插件是可执行文件,会被kubelet调用。启动kubelet --network-plugin=cni,--cni-conf-dir 指定networkconfig配置,默认路径是:/etc/cni/net.d,并且,--cni-bin-dir 指定plugin可执行文件路径,默认路径是:/opt/cni/bin。
“裸机” 使用cni
Understanding CNI (Container Networking Interface)
mkdir cni
user@ubuntu-1:~$ cd cni
user@ubuntu-1:~/cni$ curl -O -L https://github.com/containernetworking/cni/releases/download/v0.4.0/cni-amd64-v0.4.0.tgz
user@ubuntu-1:~/cni$ tar -xzvf cni-amd64-v0.4.0.tgz
user@ubuntu-1:~/cni$ ls
bridge  cni-amd64-v0.4.0.tgz  cnitool  dhcp  flannel  host-local  ipvlan  loopback  macvlan  noop  ptp  tuning
创建一个命名空间sudo ip netns add 1234567890,调用cni plugin将 container(也就是network namespace) ADD 到 network 上
cat > mybridge.conf <<"EOF"
{
    "cniVersion": "0.2.0",
    "name": "mybridge",
    "type": "bridge",
    "bridge": "cni_bridge0",
    "isGateway": true,
    "ipMasq": true,
    "ipam": {
        "type": "host-local",
        "subnet": "10.15.20.0/24",
        "routes": [
            { "dst": "0.0.0.0/0" },
            { "dst": "1.1.1.1/32", "gw":"10.15.20.1"}
        ]
    }
}
EOF

sudo CNI_COMMAND=ADD CNI_CONTAINERID=1234567890 CNI_NETNS=/var/run/netns/1234567890 CNI_IFNAME=eth12 CNI_PATH=`pwd` ./bridge < mybridge.conf
mybridge.conf 描述了network 名为mybridge的配置,然后查看1234567890 network namespace 配置
sudo ip netns exec 1234567890 ifconfigeth12 Link encap:Ethernet HWaddr 0a:58:0a:0f:14:02
inet addr:10.15.20.2 Bcast:0.0.0.0 Mask:255.255.255.0
inet6 addr: fe80::d861:8ff:fe46:33ac/64 Scope:Link
UP BROADCAST RUNNING MULTICAST MTU:1500 Metric:1
RX packets:16 errors:0 dropped:0 overruns:0 frame:0
TX packets:8 errors:0 dropped:0 overruns:0 carrier:0
collisions:0 txqueuelen:0
RX bytes:1296 (1.2 KB) TX bytes:648 (648.0 B)
user@ubuntu-1:~/cni$ sudo ip netns exec 1234567890 ip route
default via 10.15.20.1 dev eth12
1.1.1.1 via 10.15.20.1 dev eth12
10.15.20.0/24 dev eth12 proto kernel scope link src 10.15.20.2
这个例子并没有什么实际的价值,但将“cni plugin操作 network namespace” 从cni繁杂的上下文中抽取出来,让我们看到它最本来的样子。从这也可以看到,前文画了图,整理了脑图,但资料看再多,都不如实操案例来的深刻。才能不仅让你“理性”懂了,也能让你“感性”懂了
Using CNI with container runtime
Using CNI with Docker net=none 创建的容器:sudo docker run --name cnitest --net=none -d jonlangemak/web_server_1,为其配置网络 与 上文的为 network namespace 配置网络是一样的。
I mentioned above that rkt implements CNI. In other words, rkt uses CNI to configure a containers network interface.
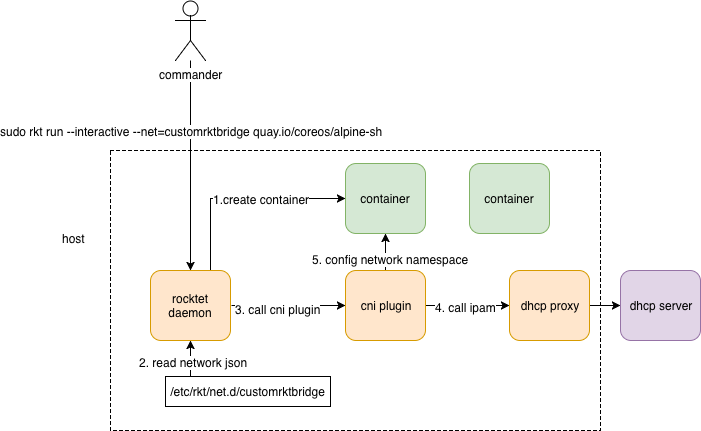
- network 要有一个json 文件描述,这个文件描述 放在rkt 可以识别的
/etc/rkt/net.d/目录下 - ` sudo rkt run –interactive –net=customrktbridge quay.io/coreos/alpine-sh
便可以创建 使用customrktbridge network 的容器了。类似的,是不是可以推断docker network create` 便是 将 network json 文件写入到相应目录下 - 表面上的
sudo rkt run --interactive --net=customrktbridge quay.io/coreos/alpine-sh关于网络部分 实际上 是sudo CNI_COMMAND=ADD CNI_CONTAINERID=1234567890 CNI_NETNS=/var/run/netns/1234567890 CNI_IFNAME=eth12 CNI_PATH=pwd ./bridge < mybridge.conf执行,要完成这样的“映射”,需要规范定义 以及 规范相关方的协作,可以从这个角度再来审视前文对CNI SPEC 的一些梳理。
笔者以前一直有一个困惑,network、volume 可以作为一个“资源”随意配置,可以是一个json的存在,尤其是network,docker network create 完了之后 就可以在docker run -net=xx 的时候使用。kubernetes 中更是 yaml 中声明一下network即可使用,是如何的背景支撑这样做? 结合源码来看 加载 CNI plugin Kubelet 会根据 network.json cmd:=exec.Command(ctx,"bridge");cmd.Run()
{
    "cniVersion": "0.2.0",
    "name": "mybridge",
    "type": "bridge",
    "bridge": "cni_bridge0",
    "isGateway": true,
    "ipMasq": true,
    "ipam": {
        "type": "host-local",
        "subnet": "10.15.20.0/24",
        "routes": [
            { "dst": "0.0.0.0/0" },
            { "dst": "1.1.1.1/32", "gw":"10.15.20.1"}
        ]
    }
}
答案就在于:我们习惯了主体 ==> 客体,比如docker早期版本,直接docker ==> container/network namespace。 而cni体系中则是runtime ==> cni plugin ==> container/network namespace。container runtime看作是一个network.json文件的“执行器”,通过json 文件找到cni plugin binary 并驱动其执行。一个network 不是一个真实实体,netowrk.json描述的不是如何创建一个网络,而是描述了如何给一个container 配置网络。
Using CNI with CRI
深入解读 CNI:容器网络接口CNI 和 CRI(容器运行时接口)是 Kubernetes 中两个关键的接口,它们分别处理容器的网络配置和运行时管理。在 Kubernetes 集群中,CRI 调用 CNI 插件来配置或清理容器的网络(处理容器网络相关的逻辑并不会在kubelet 主干代码里执行),这确保了网络配置的过程与容器的创建和销毁过程紧密协调。对于 Docker 项目来说,它的 CRI 实现叫作 dockershim,相关代码在 pkg/kubelet/dockershim 下
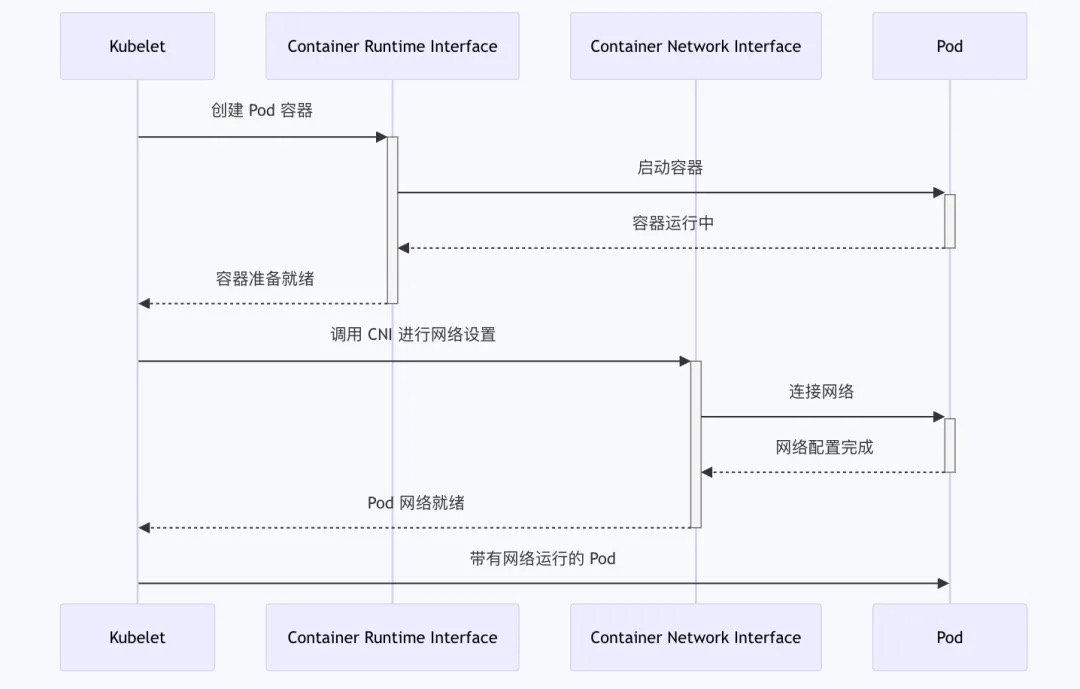
CRI 设计的一个重要原则,就是确保这个接口本身只关注容器, 不关注Pod。但CRI 里有一个PodSandbox,抽取了Pod里的一部分与容器运行时相关的字段,比如Hostname、DnsConfig等。作为具体的容器项目,自己决定如何使用这些字段来实现一个k8s期望的Pod模型。
kubelet中调用CRI shim提供的imageService,ContainerService接口,作为gRPC client,dockershim实现了CRI gRPC Server服务端的服务实现,但是dockershim仍然整合到了kubelet中,作为kubelet默认的CRI shim实现.
dockershim 封了一个pkg/kubelet/dockershim/libdocker 会使用docker提供的client来调用cli接口,没错!就是github.com/docker/docker/client。
顺着上文思路,当 kubelet 组件需要创建 Pod 的时候,它第一个创建的一定是 Infra 容器,这体现在上图的 RunPodSandbox 中
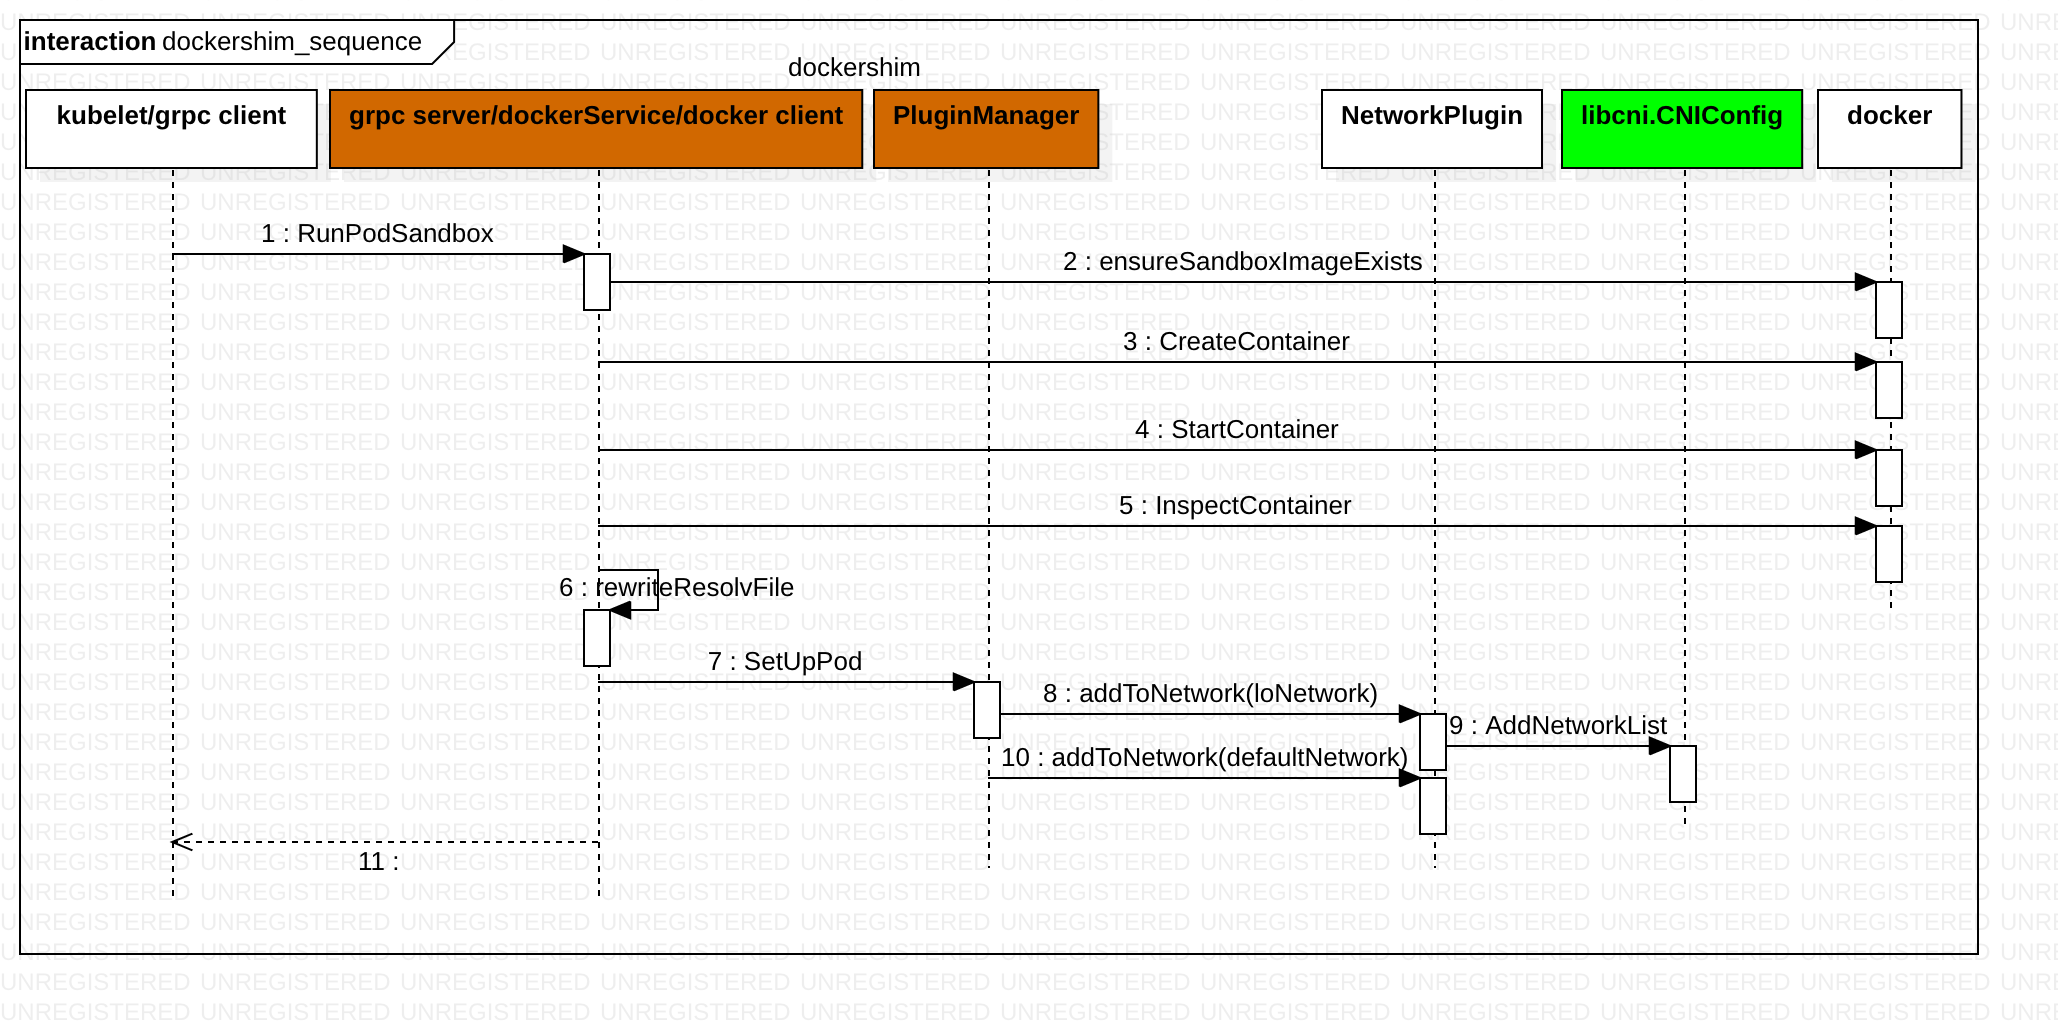
RunPodSandbox creates and starts a pod-level sandbox. Runtimes should ensure the sandbox is in ready state.For docker, PodSandbox is implemented by a container holding the network namespace for the pod.Note: docker doesn’t use LogDirectory (yet).
func (ds *dockerService) RunPodSandbox(ctx context.Context, r *runtimeapi.RunPodSandboxRequest) (*runtimeapi.RunPodSandboxResponse, error) {
    config := r.GetConfig()
    // Step 1: Pull the image for the sandbox.
    err := ensureSandboxImageExists(ds.client, defaultSandboxImage);
    // Step 2: Create the sandbox container.
    createConfig, err := ds.makeSandboxDockerConfig(config, image)
    createResp, err := ds.client.CreateContainer(*createConfig)
    ds.setNetworkReady(createResp.ID, false)
    defer func(e *error) {
        // Set networking ready depending on the error return of the parent function
        if *e == nil {
            ds.setNetworkReady(createResp.ID, true)
        }
    }(&err)
    // Step 3: Create Sandbox Checkpoint.
    ds.checkpointManager.CreateCheckpoint(createResp.ID, constructPodSandboxCheckpoint(config));
    // Step 4: Start the sandbox container. Assume kubelet's garbage collector would remove the sandbox later, if startContainer failed.
    err = ds.client.StartContainer(createResp.ID)
    // Rewrite resolv.conf file generated by docker.
    containerInfo, err := ds.client.InspectContainer(createResp.ID)
    err := rewriteResolvFile(containerInfo.ResolvConfPath, dnsConfig.Servers, dnsConfig.Searches, dnsConfig.Options);
    // Do not invoke network plugins if in hostNetwork mode.
    if config.GetLinux().GetSecurityContext().GetNamespaceOptions().GetNetwork() == runtimeapi.NamespaceMode_NODE {
        return resp, nil
    }
    // Step 5: Setup networking for the sandbox.
    // All pod networking is setup by a CNI plugin discovered at startup time. This plugin assigns the pod ip, sets up routes inside the sandbox,
    // creates interfaces etc. In theory, its jurisdiction ends with pod sandbox networking, but it might insert iptables rules or open ports
    // on the host as well, to satisfy parts of the pod spec that aren't recognized by the CNI standard yet.
    err = ds.network.SetUpPod(config.GetMetadata().Namespace, config.GetMetadata().Name, cID, config.Annotations, networkOptions)
    return resp, nil
}
与 kubeGenericRuntimeManager 类似,dockerService 方法分散在各个文件中
| go文件 | 包含方法 |
|---|---|
| docker_service.go | dockerService struct 定义 以及GetNetNS/Start/Status等 |
| docker_sandbox.go | RunPodSandbox等 |
| docker_container.go | CreateContainer/StartContainer等 |
| docker_image.go | PullImage等 |
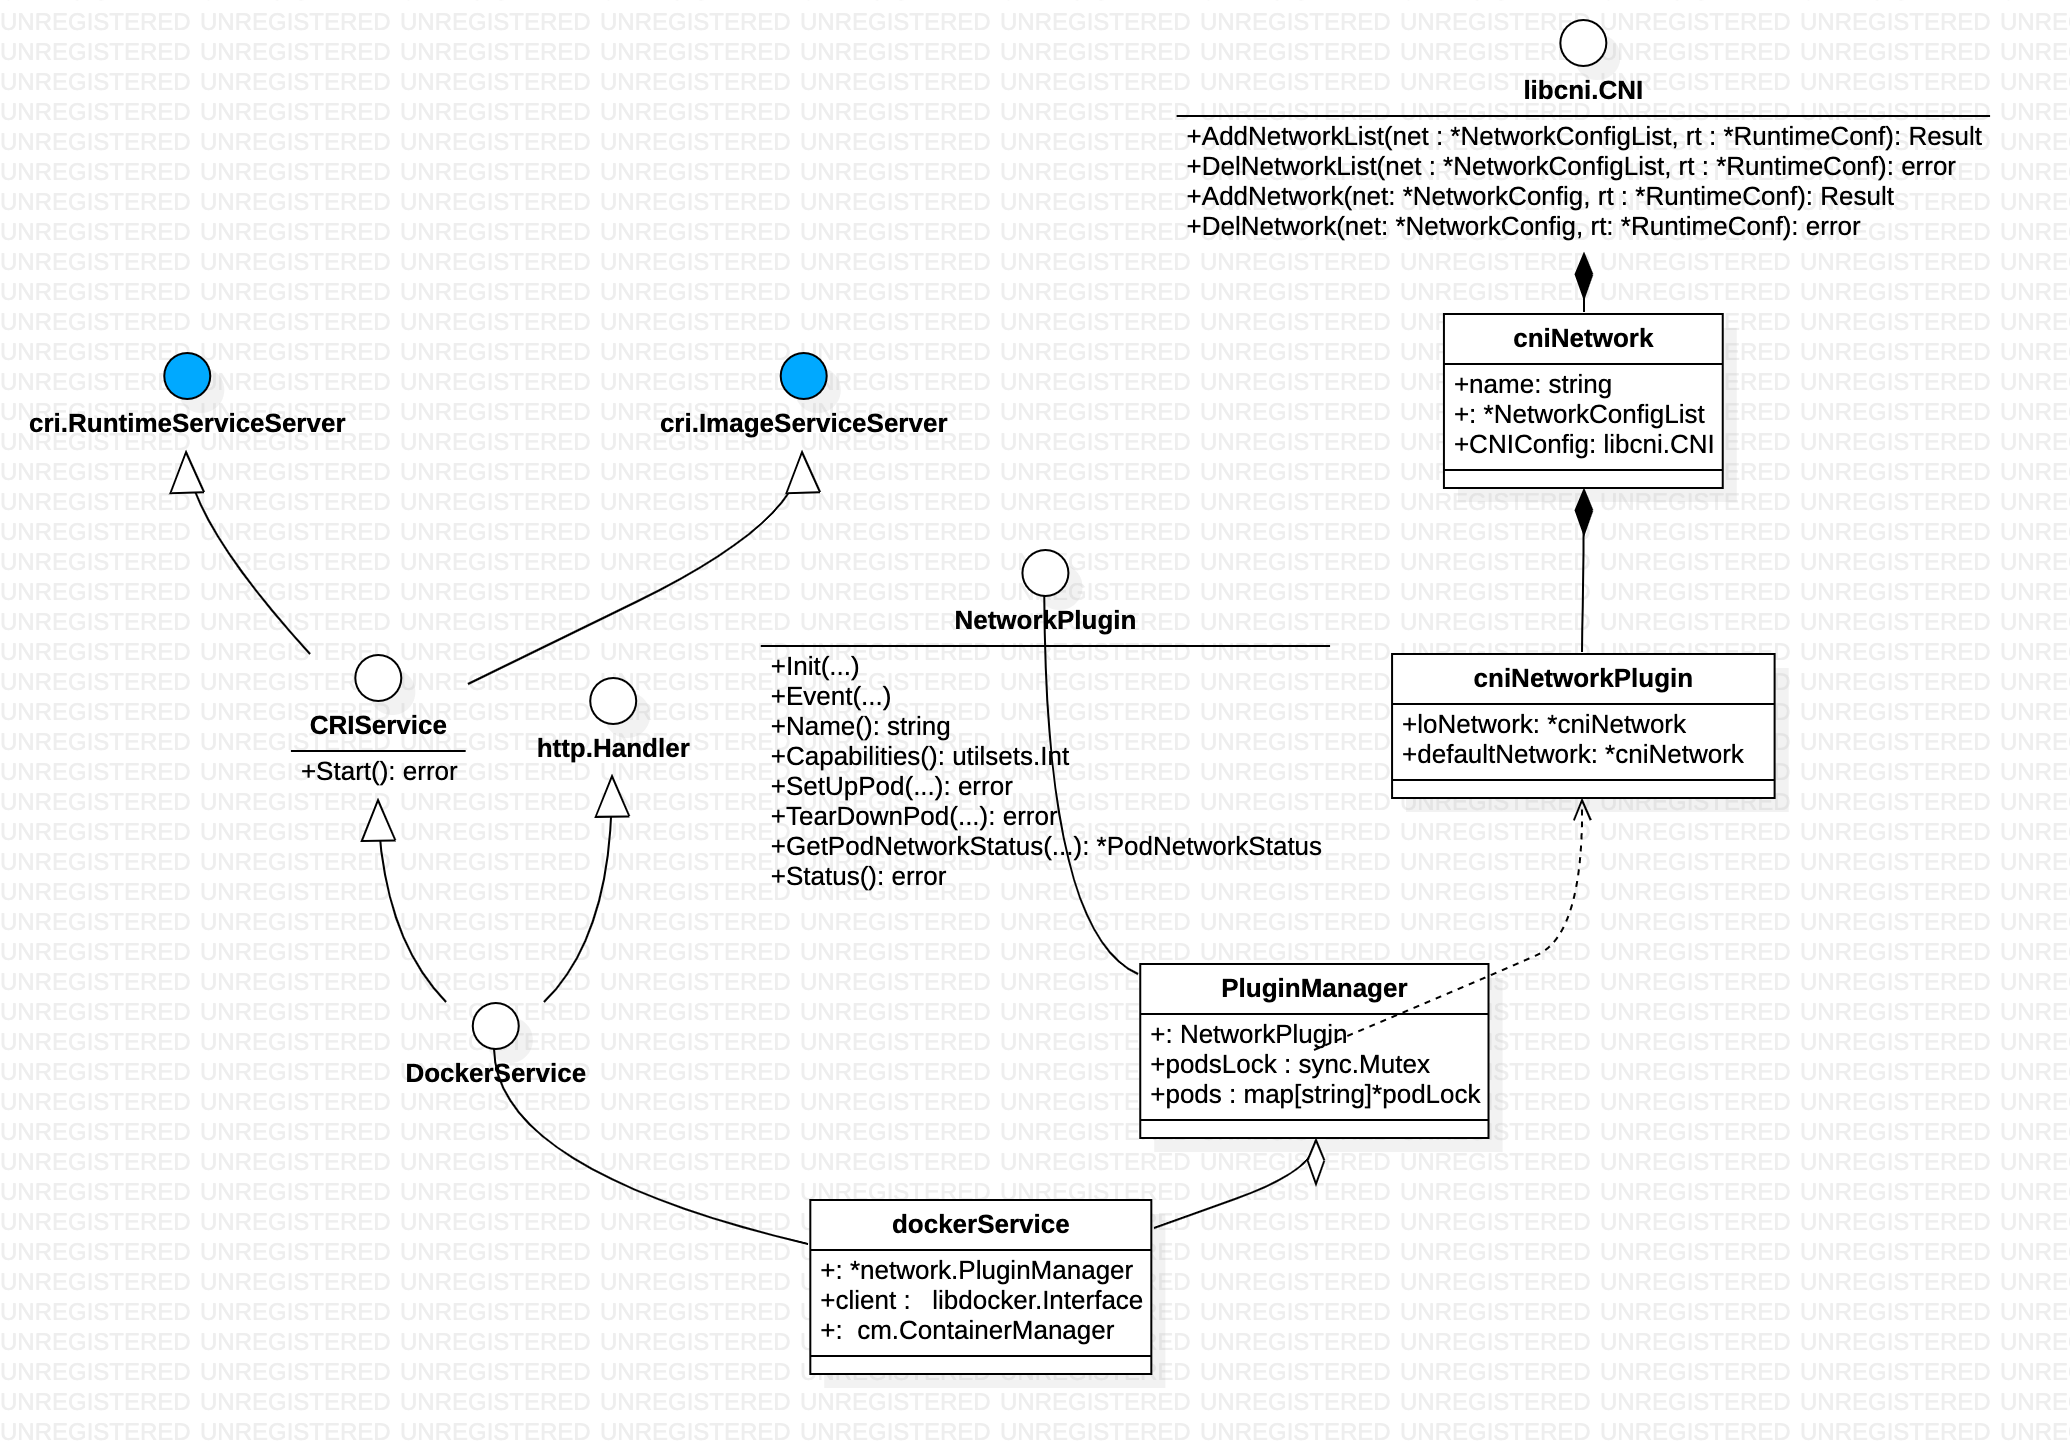
从左到右可以看到用户请求 怎么跟cni plugin(binary file) 产生关联的
golang中一个接口可以包含一个或多个其他的接口,这相当于直接将这些内嵌接口的方法列举在外层接口中一样。
加载 CNI plugin
网络是容器创建成功后分配的
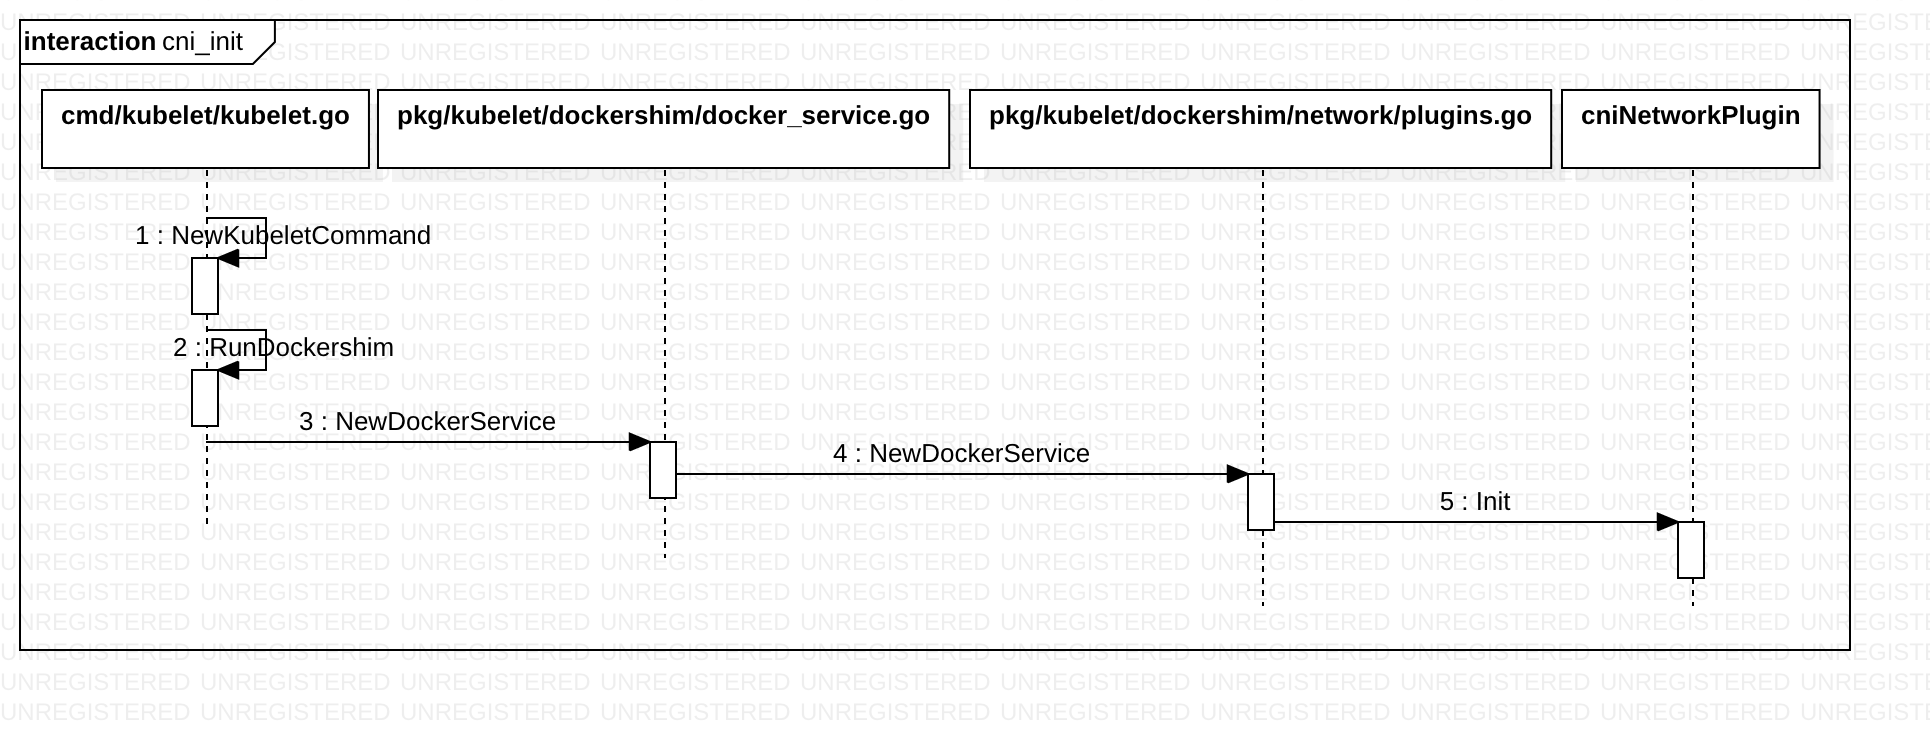
cniNetworkPlugin.Init 方法逻辑如下
func (plugin *cniNetworkPlugin) Init(host network.Host, hairpinMode kubeletconfig.HairpinMode, nonMasqueradeCIDR string, mtu int) error {
    err := plugin.platformInit()
    ...
    plugin.host = host
    plugin.syncNetworkConfig()
    return nil
}

func (plugin *cniNetworkPlugin) syncNetworkConfig() {
    network, err := getDefaultCNINetwork(plugin.confDir, plugin.binDirs)
    ...
    plugin.setDefaultNetwork(network)
}
从confDir 加载xx.conflist,结合binDirs 构造defaultNetwork
func getDefaultCNINetwork(confDir string, binDirs []string) (*cniNetwork, error) {
    files, err := libcni.ConfFiles(confDir, []string{".conf", ".conflist", ".json"})
    sort.Strings(files)
    for _, confFile := range files {
        var confList *libcni.NetworkConfigList
        if strings.HasSuffix(confFile, ".conflist") {
            confList, err = libcni.ConfListFromFile(confFile)
            ...
        }
        network := &cniNetwork{
            name:          confList.Name,
            NetworkConfig: confList,
            CNIConfig:     &libcni.CNIConfig{Path: binDirs},
        }
        return network, nil
    }
    return nil, fmt.Errorf("No valid networks found in %s", confDir)
}
docker service 作为grpc server 实现,最终还是操作了 CNI,CNIConfig接收到指令后, 拼凑“shell指令及参数” 执行 cni binary文件。CNI 插件的初始化就是 根据binary path 初始化CNIConfig,进而初始化NetworkPlugin。至于cni binary 本身只需要执行时运行即可,就像go 运行一般的可执行文件一样。
github.com/containernetworking/cni/pkg/invoke/raw_exec.go
func (e *RawExec) ExecPlugin(ctx context.Context, pluginPath string, stdinData []byte, environ []string) ([]byte, error) {
    stdout := &bytes.Buffer{}
    c := exec.CommandContext(ctx, pluginPath)
    c.Env = environ
    c.Stdin = bytes.NewBuffer(stdinData)
    c.Stdout = stdout
    c.Stderr = e.Stderr
    if err := c.Run(); err != nil {
        return nil, pluginErr(err, stdout.Bytes())
    }
    return stdout.Bytes(), nil
}
CNI 实现
github.com/containernetworking/cni/pkg/skel/skel.go 定义了 dispatcher 和 CmdArgs struct
// github.com/projectcalico/cni-plugin/cmd/calico/calico.go
func main() {
	plugin.Main(VERSION)
}
// github.com/projectcalico/cni-plugin/pkg/plugin/plugin.go
func Main(version string) {
    ...
	skel.PluginMain(cmdAdd, nil, cmdDel,
		cniSpecVersion.PluginSupports("0.1.0", "0.2.0", "0.3.0", "0.3.1"),
		"Calico CNI plugin "+version)
}
func cmdAdd(args *skel.CmdArgs) error {...}
func cmdDel(args *skel.CmdArgs) error {...}
cni plugin 是一个二进制文件,执行时 执行main 方法 ==> skel.PluginMain ==> dispatcher.pluginMain ,CmdArgs 约定了调用参数,任何插件都是这样一个套路,只需实现cmdAdd 和 cmdDel 即可,用于对应添加网卡和删除网卡两个操作。
// github.com/projectcalico/cni-plugin/pkg/plugin/plugin.go
func cmdAdd(args *skel.CmdArgs) error {
    ...
    // 获取Calico的配置,节点的名称,Calico客户端,是为了生成这个Pod唯一的WEP(Workload Endpoint)名称,也即网卡的名称。
    calicoClient, err := utils.CreateClient(conf)
    ...
    if wepIDs.Orchestrator == api.OrchestratorKubernetes {
		if result, err = k8s.CmdAddK8s(ctx, args, conf, *wepIDs, calicoClient, endpoint); err != nil {
			return err
		}
    }
    ...
}
// github.com/projectcalico/cni-plugin/pkg/k8s/k8s.go
func CmdAddK8s(ctx context.Context, args *skel.CmdArgs, conf types.NetConf, ...) (*current.Result, error) {
    ...
    client, err := newK8sClient(conf, logger)
    if conf.IPAM.Type == "host-local" {...}
    if conf.Policy.PolicyType == "k8s" {...}
    ipAddrsNoIpam := annot["cni.projectcalico.org/ipAddrsNoIpam"]
	ipAddrs := annot["cni.projectcalico.org/ipAddrs"]
    ... // 构造routes, endpoint, 从pod 中获取annotation 等数据, 可以通过设置 pod annotation 来控制pod的 网络配置,比如ip地址等
    switch {
        case ipAddrs == "" && ipAddrsNoIpam == "":
            ...
        case ipAddrs != "" && ipAddrsNoIpam != "":
            ...
        case ipAddrsNoIpam != "":
            ...
        case ipAddrs != "":
            ...
            result, err = ipAddrsResult(ipAddrs, conf, args, logger)// 调用IPAM插件,获得一个IP地址
            ...
    }
    d, err := dataplane.GetDataplane(conf, logger)
    hostVethName, contVethMac, err := d.DoNetworking(args, result, desiredVethName, routes, endpoint, annot)
}
// github.com/projectcalico/cni-plugin/pkg/dataplane/dataplane.go
func (d *linuxDataplane) DoNetworking(
    args *skel.CmdArgs,
	result *current.Result,
	desiredVethName string,
	routes []*net.IPNet,
	endpoint *api.WorkloadEndpoint,
	annotations map[string]string)(...){
        // Clean up if hostVeth exists.
        ns.WithNetNSPath(args.Netns, func(hostNS ns.NetNS) error {
            // 先是建立veth pair,一边是contVethName,将来是容器内的,另一边是hostVethName,将来是容器外的。 主机端 cali 开头,后面 11 位是容器的 id 开头
            veth := &netlink.Veth{
                LinkAttrs: netlink.LinkAttrs{
                    Name:  contVethName,
                    Flags: net.FlagUp,
                    MTU:   d.mtu,
                },
                PeerName: hostVethName,
            }
            netlink.LinkAdd(veth)
            // host veth 给容器外的网卡设置MAC地址,状态设置为UP
            hostVeth, err := netlink.LinkByName(hostVethName)
            netlink.LinkSetHardwareAddr(hostVeth, "EE:EE:EE:EE:EE:EE")
            netlink.LinkSetUp(hostVeth)
            // container veth 给容器内的网卡设置MAC地址,IP地址,路由等
            contVeth, err := netlink.LinkByName(contVethName)
            // Fetch the MAC from the container Veth. This is needed by Calico.
            contVethMAC = contVeth.Attrs().HardwareAddr.String()
            if hasIPv4 {
                // Add a connected route to a dummy next hop so that a default route can be set,  169.254.1.1在这里
                gw := net.IPv4(169, 254, 1, 1)
                gwNet := &net.IPNet{IP: gw, Mask: net.CIDRMask(32, 32)}
                err := netlink.RouteAdd(
                    &netlink.Route{
                        LinkIndex: contVeth.Attrs().Index,
                        Scope:     netlink.SCOPE_LINK,
                        Dst:       gwNet,
                    },
                )
                for _, r := range routes {
                     ip.AddRoute(r, gw, contVeth)
                }
            }
            if hasIPv6 {...}
        }
        // Now add the IPs to the container side of the veth.
		for _, addr := range result.IPs {
			netlink.AddrAdd(contVeth, &netlink.Addr{IPNet: &addr.Address})
        }
        // Now that the everything has been successfully set up in the container, move the "host" end of the
		// veth into the host namespace. 将host端的网卡从容器移出去,配置路由
        netlink.LinkSetNsFd(hostVeth, int(hostNS.Fd()))
    }
    // Moving a veth between namespaces always leaves it in the "DOWN" state. Set it back to "UP" now that we're
	// back in the host namespace.
    hostVeth, err := netlink.LinkByName(hostVethName)
    netlink.LinkSetUp(hostVeth)
    // Now that the host side of the veth is moved, state set to UP, and configured with sysctls, we can add the routes to it in the host namespace.
    SetupRoutes(hostVeth, result)   // 配置外界到容器的路由
    ...
}
github.com/vishvananda/netlink 提供 封装了系统调用,可以实现 ip link 命令的效果。
其它
Kubernetes 集群管理员可配置和安装 kubelet、container runtime、network provider,并在每个节点上分发 CNI 插件。Network provider agent(比如flanneld) 启动时,将生成 CNI 配置(flannel 以pod 运行时,会有一个init 容器在所在节点 创建 ` /etc/cni/net.d/10-flannel.conflist 文件,当 Flanneld 启动时,它将从 apiserver 中获取 podCIDR 和其他与网络相关的详细信息,并将它们存储在文件中/run/flannel/subnet.env`)。在节点上调度 Pod 后,kubelet 会调用 CRI 插件来创建 Pod。之后, CRI 插件调用 CNI 配置中指定的 CNI 插件来配置 Pod 网络。
wiki 在描述驱动系统时提到:A driver provides a software interface to hardware devices, enabling operating systems and other computer programs to access hardware functions without needing to know precise details about the hardware being used. CNI interface 将一个复杂的系统收敛到几个“入口”,运用之妙存乎一心。
